The whole industry seems to be discussing this topic. Here’s what Modern Machine Shop has to say about "Tool System Considerations For High Speed Machining".
Once a machine gets the cutter to the work, it’s the tool system that makes the chips that make you money. The faster a shop cuts, the more interdependent each component becomes. From cutting edge to spindle nose, a high speed cutter must operate as a system.
By Chris Koepfer, Senior Editor
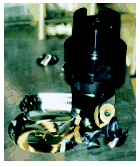 Research into the cutting mechanisms that occur between high speed cutting tools and a workpiece is yielding better understanding of the machining process. A result of this work is helping make selection of the right combination of cutting tool material, coatings, geometry, shank, and toolholder more an exercise in science than art.
To get some insight on current research into high speed machining, from a cutting tool perspective, we visited the Engineering Research Center (ERC) at The Ohio State University (Columbus, Ohio). They are looking closely at the mechanics of the cutting process.
Among the numerous research projects being conducted by the ERC lab is a high speed machining project that ultimately will result in a database of feeds, speeds, tool geometry, and tool material that will be matched to the material and cutting requirements of a shop.
ERC’s lab uses a strong simulation package that allows researchers to graphically illustrate what’s happening in the cut. Using "what if" scenarios, different parameters and permutations can be tested.
In the lab’s attached machine shop, a Makino horizontal machining center is used to confirm the high speed milling simulation. This process of confirming by cutting has helped ERC continuously refine their simulation, enabling it to get close to reality.
In The Chips
Integral to high speed machining is chip formation. Material is removed in a controlled way thereby modifying the existing geometry by creating a new shape. The fundamentals of what happens when a cutter meets metal, at conventional speeds and feeds, has been understood for many years.
|
|
|
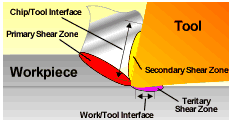
The illustration above shows the action that occurs in the cutting zone. Plastic deformation allows the chip to shear from the parent material in the primary zone. |
Chips are formed by deformation of the parent material. As a cutting edge moves into steel, cast iron, aluminum, or other materials, it generates high temperatures and stress in the material at the point of intersection and slightly ahead of the cutting tool edge.
These stresses and temperatures are sufficient that plastic deformation of the workpiece material takes place. The metal deforms easily within an area called the primary shear zone. As the material reaches its yield point, a chip breaks away from the parent material and slides along the primary shear plane, pushing material ahead of the cutting tool.
A secondary shear zone occurs along the face of the cutting tool. As the chip slides up the face of the cutter, friction raises temperatures in this zone. Studies reveal that the secondary zone temperature is as high as 1200 degrees Celsius when machining tool steel.
As the cutting edge moves through the material, deforming the material to shear a chip, a third shear zone occurs under and behind the leading edge. This zone is a result of material spring back.
Key to successful matching of cutter and workpiece is predicting when the deformation process will occur, and as a result of that prediction, determine the force necessary to drive the cutter. It is also important to understand how heat will be dissipated in the cut.
At High Speed
Much of the chip formation mechanics at high speed involve heat. At high speed, which is relative to the material being cut, higher heat is generated. More energy is going into the workpiece and that energy becomes heat.
Higher temperature at the primary shear zone helps speed up the plastic deformation process that results in a chip being formed. Because of the increased rate of plastic flow, high speed cutting experiences a decrease in the cutting force needed to remove a chip.
Researchers estimate the heat input distribution this way:
- About 80 percent of heat is generated by the mechanical deformation that creates the chip,
- 18 percent is created at the chip/tool interface or secondary shear zone, and
- 2 percent is created on the tool tip.
What goes in must come out. In the case of high speed machining, heat generated in the cut is dissipated three ways:
- About 75 percent is taken by the chip,
- 5 percent by the workpiece, and
- 20 percent is conducted through the tool.
Some of ERC’s experiments involve manipulating tool parameters to influence the heat input and output percentages. For example, by using a cutter with a coating that insulates, the researchers can reduce the amount of heat conducted through the tool and thereby redirect more of the heat into the chip and workpiece. It’s a balancing act.
Cutters
|
|
||
|
|
|
|
|
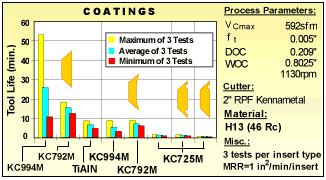
High speed tests run at ERC in hardened H13 steel demonstrated tool life performance of different insert geometries and coatings. Test parameters are listed to the right of the chart. Inset photos show examples of different coatings. |
||
For high speed applications, centrifugal force becomes significant. In Germany, new standards for safe operation of high speed cutters have been proposed.
These proposals are based on cutter diameter. For cutters 6 to 8 mm in diameter, a recommended speed of 45,000 to 50,000 rpm would be the operational high end for those tools. For 12 mm diameter cutters, recommended speeds would be 15,000 to 20,000 rpm.
Solid body cutters handle the centrifugal forces better than indexable inserts, but most cutting tool makers have high speed configurations that can handle the forces. Moreover, most of the high speed research being done at ERC involves indexable insert cutters.
They are cutting primarily in tool steel. Cutter geometry is generally a neutral to positive cutting edge. They do not recommend a chip breaker for material hardness above 45 Rc. The breaker tends to weaken the cutting edge. ERC’s tests show a simple straight geometry has the best results cutting hardened tool steel.
Holding On
Regardless of the cutter body used for high speed machining, the toolholder is an important component to successful machining. Debate continues between basically two toolholder standards—steep taper V-flange and HSK (the German translation means "hollow shank taper").
In reality, the debate is not between competing toolholder standards but rather centers around two methods of securing the holder in the spindle. So what’s the big deal about HSK versus V-taper? Fundamentally, the difference between these systems is how they seat in the machine tool spindle bore.
We’ll look at V-flange first. Regardless of the taper size, 30, 40, 50 or other, the V-taper or steep taper toolholder is pulled into the spindle bore by a draw bar or similar mechanism. The toolholder seats on a mating taper in the spindle. This system serves shops well, and probably a majority of machining center tools are of this design.
The HSK toolholder is designed to provide simultaneous fit on both the spindle face and the spindle taper. There are other hollow shank designs in addition to HSK. Common to all is the idea of two-plane fit between holder and machine spindle.
|
|
|
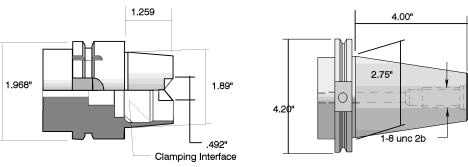
Equivalent toolholder sizes of HSK and V-taper. The difference in shank length is dramatic between the toolholder standards of 4 inches for the V-taper and 1.259 inches for the HSK. This illustration is courtesy of Dapra. |
Simultaneous fit is not exclusive to HSK. There are other designs, including one that is a steep taper, one that provides simultaneous spindle taper and one for face contact. In this case, two-plane contact is achieved by adding stock to the toolholder flange and spindle nose, effectively closing the 3 mm gap between the two surfaces and delivering a taper and face fit for V-taper tools.
High Speed Toolholders
At any speed, a machine tool spindle is subjected to centrifugal force. Centrifugal force increases geometrically as speed increases. This means if you double spindle speed, centrifugal force goes up by a factor of four.
At high speed, centrifugal force is strong enough to make the spindle bore grow slightly. Because V-flange tools contact the spindle bore only in the axial plane, spindle growth can cause the tool to be drawn up into the spindle by the constant pull of the drawbar. This can lead to a stuck tool or dimensional inaccuracy in the Z axis.
Simultaneous fit tooling has contact on the spindle face and taper. When this spindle begins to grow, the face contact prevents the tool from moving up the bore. The hollow shank design is also susceptible to centrifugal force but it is designed to grow with the spindle bore at very high speeds.
Rigidity is another touted advantage for simultaneous fit tooling. Supporting the cutting tool and holder in both the axial and radial planes makes a significantly more rigid connection between the tool and spindle.
Spindle face contact lowers the bending moment for the tool from inside the spindle bore to outside the bore on the face. It increases contact area giving better rigidity, which enables users to cut with longer tools and to use side-cutting milling tools more aggressively.
For high speed machining applications, the trend definitely points toward simultaneous fit, spindle tool interface as a requirement.
|
|
|
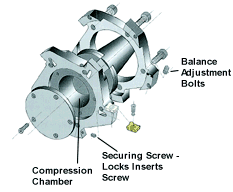
High speed means high centrifugal force. Reinforced cutter bodies, such as this Iscarface mill, all shops to safely machine with indexable inserts as well as solid body cutters. This illustration is courtesy of Iscar Metals. |
Squeeze That Tool
How the cutter body is gripped in the toolholder is another tooling consideration for high speed machining. Some toolholders are not symmetrical. For example, some have drive notches that are of unequal size. Others use side-locking setscrews or other asymmetrical features. This creates less impact at conventional machining speeds.
A shop planning to do HSM should try to build tools using a holder and cutter combination that is symmetrical. Shrink fit, which uses a heated bore that expands for the cutter and then clamps as it cools is a popular HSM choice. It’s simple, reliable, and economical.
Hydraulic toolholders work the same as shrink fit in that they support the tool shank completely. These holders use hydraulic pressure to actuate a membrane or other device to grip the tool. Regardless of the toolholder cutter combination, symmetry is a key consideration.
It’s Now
Many technologies have coalesced to make high speed machining a practical process. Machine tool actuation, high speed/high frequency spindles, cutting tools, high accuracy balancing, and software to run powerful CNCs all combine to make HSM a defining trend in metalworking manufacturing.
At day’s end, success is measured by how many good parts ship and how profitably they were produced. High speed machining is a means to this goal by reducing cutting forces, increasing metal removal rates, improving heat dissipation, and making better surface finishes.
But high speed machining is a system, with its many components interlinked. Understanding the interplay between these various components may help you take better advantage of HSM in your shop.
For more information about the HSM work at ERC, contact the researchers by phone at 614-292-3840.
Recommendations
The research at ERC, which is on-going, has a laundry list of recommendations for high speed cutting. These are based on their simulation and verification experiments, which were conducted using H13 steel (46 Rc).
- Select symmetrical tool designs. Sticking a whistle-flat cutter into the holder and tightening a side-mounted setscrew won’t do for HSM. It’s best to start with toolholders that are symmetrical (HSK style E and F for example) and use a wraparound connector such as shrink fit or hydraulic holders. This will help eliminate vibration before it can occur. Likewise cutter shanks should be round—no hold-down flats.
- Keep chip thickness constant. Maintaining a constant chip thickness is key to stable cutting. A constant chip thickness equates to constant chip load.The maintenance of which keeps the high speed cutting bugaboo of chatter reasonably at bay. Calculate tool path with constant load in mind.
- Use multi-layer coatings. For cutting steel, use TiN, TiCN, TiN physical vapor deposition (PVD) over chemical vapor deposition (CVD). Performance of these coating combinations and application methods gives longer tool life with better heat transfer.
- In hardened steel, use inserts with a flat rake face. At the cutting speeds ERC is using, they have found a chip breaker unnecessary. A breaker used on a cutter at high speed in tool steel can weaken the cutting edge and increase wear on the cutter face.
- Use high pressure air to clear chips. ERC’s research, along with the experience of other high speed machining practitioners, recommends cutting without coolant when possible. At the surface speeds that the cutting tools are traveling, coolant cannot get into the cut zone. Coolant’s primary values for HSM are chip clearance and lubrication. An air-and-oil mist combination is considered a better medium for chip evacuation than coolant because it introduces much less thermal shock to the cutter.
While ERC’s research is targeted at high speed machining of molds and dies, many of their recommendations carry over to other materials as well.
Re-posted with permission. Copyright © 1998 by Gardner Publications.
Click here for more industry news from Modern Machine Shop


